Use Cases for Cisco Secure Endpoint
If you haven’t used the Cisco In Product Support previously, please read steps 1 and 2 below. For experienced users, proceed directly to step 3 to learn how to start using supported extension features.
Step 1: Install the Chrome Extension
- Download and Install: Download the Cisco In Product Support Chrome extension from the Chrome Web Store and click "Add to Chrome" to install it, ensuring the browser extension is available for immediate use.
- Enable Extension: Once the extension is installed, ensure it is enabled by checking the extensions menu in Chrome and confirming that the Cisco In Product Support is active.
Step 2: Activate the Extension
-
Navigate to Cisco Secure Endpoint: Open Chrome and navigate to a supported Cisco product such as Cisco Secure Endpoint to initiate the activation process.
-
Pop-Up Activation: Upon visiting the supported product page, you will see a pop-up that says "Unleash the power of TAC virtual assistants and activate Cisco In Product Support extension."
-
Click to Activate: Click on the pop-up notification to trigger the Cisco.com authentication workflow.
-
Authenticate: Complete the authentication process on Cisco.com by entering your credentials and verifying your identity.
-
Confirmation: Once authenticated, you will see that the extension is marked as "On," and your name will appear when you click on the extension icon in the Chrome toolbar.

Step 3: Using the Extension Features
A. Opening a Cisco Support Case
- Open Extension: Click on the Cisco In Product Support extension icon located in the Chrome toolbar to open the extension interface.
- Select 'Open Support Case': In the extension interface, choose the option to open a new support case, which will guide you through the necessary steps.

- Record Issue: Optionally, use the screen recording feature to capture and explain your issue visually and verbally, which can be extremely helpful for the support team (detailed instructions in Step 4).
- Submit Case: Fill in the required details, such as the issue description and relevant information, and submit your support case through the extension interface.

B. Case Listing
Viewing Created Cases
- View Case List: To see the details and status of your created cases, click 'Case List' in the In-product Support extension.

- Cases Created: Once loaded, you'll see a list of your cases, including the Support Request number, Case title, Severity, last updated date, created date, and the current status.

- Expand for More Details: Expand any case row to view additional information, such as the case owner and manager details. You'll also have the option to view your case in SCM.

Search and Filter
- Search: Use the search field to find a specific case by entering the complete Cisco Support Case number. Partial entries will only match items that are currently visible.

- Filter: Filter cases by their status such as Open, Draft, or Closed, to quickly sort and view only the cases relevant to your needs. Only cases matching the selected status will be shown.

More Actions
- Refresh List: Click the refresh button to update the case list and display the most recent changes or updates.
- Sort Cases: Organize your cases by sorting the table rows based on different columns, such as date created, severity, or status.
- Navigate Pages: Easily browse through multiple pages of cases using the pagination controls at the bottom of the list.
C. Recording Your Screen
- Start Recording: Click on the extension icon in the Chrome toolbar and select the "Record Screen" option to initiate the screen recording process.

- Begin Recording: Follow the on-screen instructions to start the screen recording, capturing all relevant actions and information.

- Choose Recording Area: You will be prompted to select whether you want to record a specific Chrome tab, the entire browser window, or your entire desktop screen.

- Microphone Permission: Optionally, allow the extension to access your microphone to provide an audio explanation of your issue, enhancing the clarity of your recording.

- Add Screenshots: During the recording, you can double-click any screen to add a screenshot, which will be included in the support case along with the video recording.
- Stop Recording: To stop the recording, click the "Stop" option in the floating bar at the bottom of the screen or click on the extension icon and select the stop recording button.
- Upload Recording: Once the recording is stopped, you will have the option to upload the video to an existing case by entering the nine-digit Cisco Support Case number or open a new case.

D. Upload Local File to Case
- Upload File: Click ‘Upload Files to Case’ in the extension interface.

- Choose File: In the modal that pops up, click 'Choose file’ and browse through your local files to upload the preferred file.
- Select Case: Enter an existing Cisco Support Case number or open a new case to upload your file to.

- Allowed File Types: Allowed file extensions include jpg, png, mp4, and zip files. If .pkg or .exe files are uploaded, the pop-up will prompt an error message.
- Case Number Search: Conveniently, you can also enter a case number to search from a list of existing cases.
- Upload Confirmation: After clicking ‘Upload,’ allow a moment for your file to be added to the case. You will receive a confirmation prompt once your file has been successfully uploaded. Additionally, you have the option to cancel the upload while it is in progress.
E. Collecting HAR Logs
- Initiate Log Capture: Click on the Cisco In Product Support extension icon and select the "Collect HAR Logs" option to start capturing log data.

- Navigation Instruction: A pop-up will appear instructing you to navigate through different pages and reproduce the issue, allowing the extension to capture the relevant HAR logs.

- Start Capture: Click "OK" on the pop-up to begin the HAR log capture process.
- Stop Capture: Once you have reproduced the issue and captured the necessary data, click the same button to stop the hard log capture.
- Upload Logs: You can then choose to upload the collected logs to an existing support case by entering the nine-digit Cisco Support Case number or open a new case if needed.
Step 4: Submitting Information to TAC
- Existing Case: If you are uploading information to an existing case, enter the nine-digit Cisco Support Case number to ensure the logs or recordings are attached to the correct case.
- New Case: If you are opening a new case, the extension will pre-populate certain information based on the activities performed during the hard log capture or screen recording process, prompting you to complete the remaining details.
- Confirmation: After submitting the information, you will receive email notifications confirming the file uploads or the creation of the new case, ensuring that the TAC team has all the necessary data to start working on your issue.
Step 5: Follow-Up
- TAC Response: The TAC team will review the submitted information and may reach out for additional details if necessary, starting the process of troubleshooting and resolving the issue.
- Issue Resolution: TAC will work on resolving the issue based on the provided data, potentially reducing the need for additional Webex meetings or back-and-forth emails, thereby accelerating the resolution process.
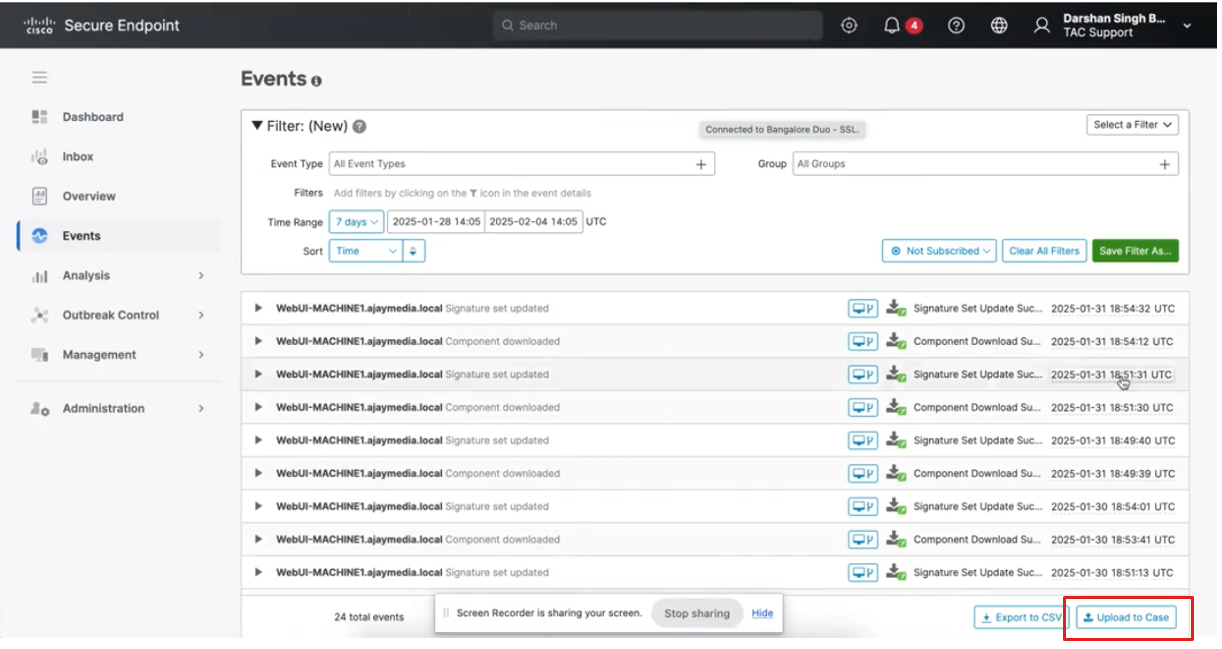
Upload to Cisco Support Case on Secure Endpoint
Upload to case has been enabled on some pages on Secure Endpoint for directly uploading the data to user’s case.
Events
Upload to Cisco Support Case is available on, Event -> "Export to CSV"
Watch video tutorials to reinforce your understanding:
- Activate the Extension
- Upload HAR Logs to Support Case
- Uploading Files to Support Case
- Uploading Events to Support Case